Let the audience decide when to switch the image, as opposed to a non-stop timeline loop.
*Supported on screenpublishing App for Android 4.2.0+ and Windows App 9.1.1+
Assemble photos in an image carousel slider with the interactivity feature. See the result below:
In this tutorial, we are going to create a simple four photo carousel. Get the images used for the above campaign in this zip file, or set your own images.
Besides creating a Campaign from scratch, we are going to use the interactivity feature. If you don’t know how to use interactivity, we highly recommend you take a look at the following tutorials to better understand the topic:
- How to create an interactive campaign
- How to create interactive menus
- How to create expanded interactive menus
- In your screenpublishing account, create a Campaign. Fill out the basic info, such as name and category.
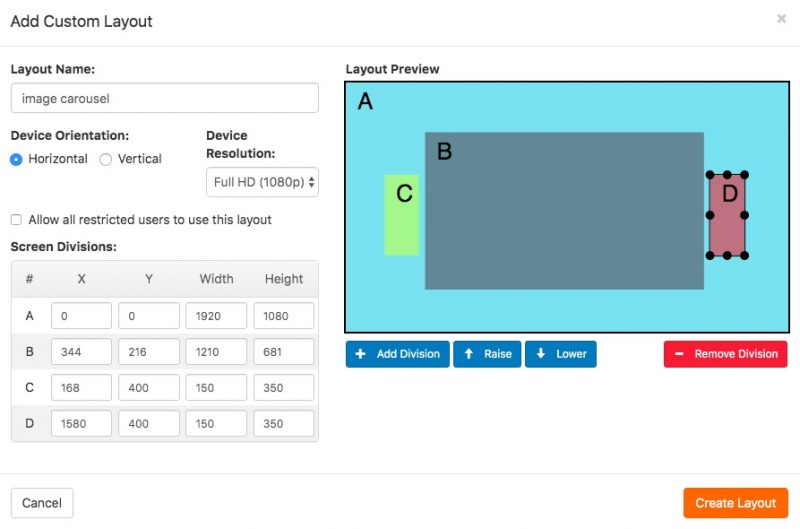
- A carousel slides consists of three basic elements: a central photo frame and two buttons to go back and forth in the pictures. Hence, click on “Add Custom Layout” and create a zone for each of those. We have also created a screen zone for the background image.
- Upload to your screenpublishing platform the images you are going to use in this specific Campaign. In your Timeine, place the buttons in their respective screen zone, place the image background and a single photo of the carousel.
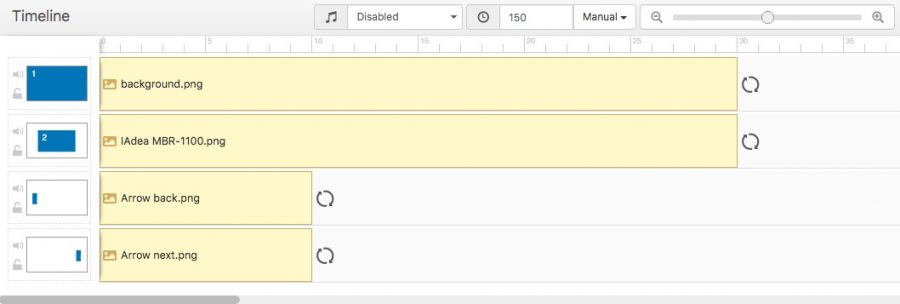
Don’t place more than one photo in the carousel frame, or else it won’t obey the button commands we will set later, instead playing non-stop on loop.
- Publish the Campaign to a Player. When you reach the “Published to these Players” page, select “Interactivity” on the left menu below the Campaign thumbnail.
- Now we are going to add interactivity to our carousel slider! Before setting actions, decide on the carousel photo sequence. We have used the following sequence to the pictures available in the zip file: IAdea.png > j22.png > minix x5.png > minix x7.png > IAdea > j22 (…) etc.With the sequence set, we need to set an action to both buttons around each photo. It is important that one action only happens to a specific photo, so we need to apply filters to each action.
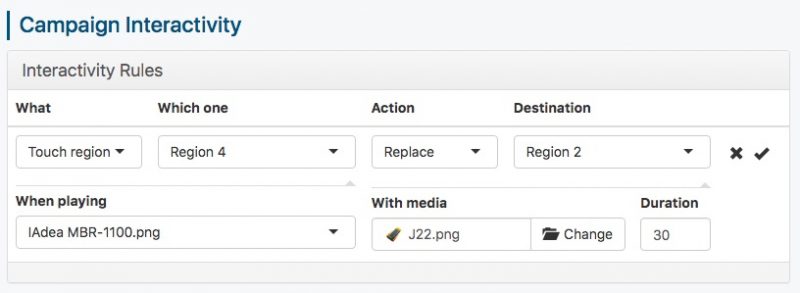
Let’s first set the action to the next button when the IAdea photo is exhibited in the Campaign. Fill out the fields as follows:
- Action: Touch region
- Which one: Region 4, which is the “next button”.
- Action: Replace
- Destination: Region 2, which is the photo frame
In the row below, we are going to set a filter so it only changes to the next photo of the sequence (j22.png) when the specific photo is on screen. Thus, only when “IAdea.png” is shown, the next button action will change it to “j22.png”.
- When playing: IAdea
- With Media: j22
- Apply actions to all following buttons with the right filters. This is going to be a little bit of effort, but it’s worth it. Don’t forget the back button!
- Click on “Save changes” when you are done and test the campaign on your player!